How do I View my Camera Over the Internet?
A guide for setting up your Airsight camera before port forwarding
This step by step guide should be able to guide anyone through the procedures for getting your cameras set up so you can port forward them in the least painless way possible.
The
X10 Wiki contains all of this information. However, the wiki doesn't really give you a lot of guidance for which ports or IPs you should use. My hope is that this will be a more readable format. I have suggested best practices to make sure your setup is not only working but working reliably for a long period of time.
This guide will include information for setting this up on a PC. I may do a Mac version at a later date.
Step One: Gather InformationWe should begin by collecting all of the information we need. We will need:
- Default Gateway (your router's IP)
- IPv4 Address (your computer's IP)
- Your router's make and model number
- The login information for your router
Go look at your router and make a note of the make and the model number. You'll need this later. If there is a username and password on your router, note this as well.
Now we will find your IP information. There are a few ways to do this. By far the easiest way is to hit
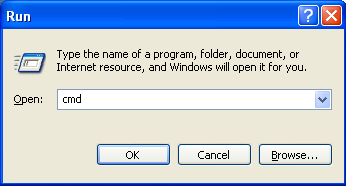
CTRL + R on your keyboard. This will open the Run Dialog. Type in
cmd and hit enter; this will open the command prompt.
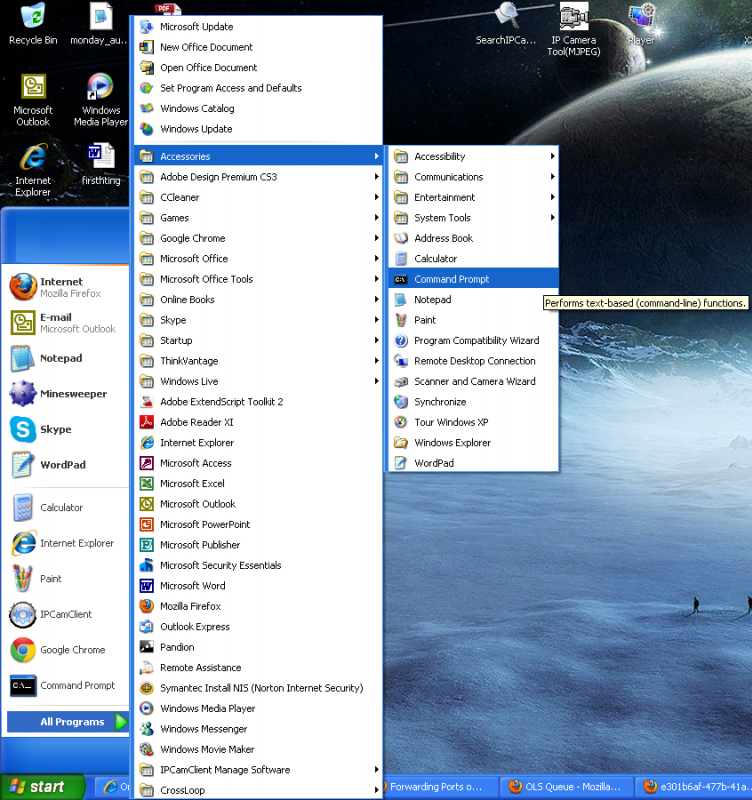
If you can't do that for some reason you can find the command prompt by going to Start -> All Programs -> Accessories -> Command Prompt.
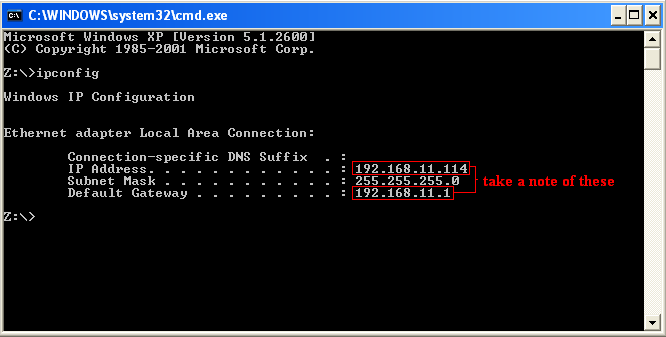
Once you have the command prompt open type in
ipconfig and hit enter. You should then have a screen in front of you that shows you a whole bunch of stuff. The only things we need to concern ourselves with at this point are the
default gateway and
IPv4 address. These should be right next to each other. If your default gateway has any letters or colons in it you need to keep looking. Write this information down, you'll need it in the next step.

 Step Two: Static IP
Now we need to assign a static IP address to the camera. Log in to your camera through the web browser software. It doesn't matter what browser or mode you log in to at this point. I advise just logging in to it through the IP camera tool.
Here the instructions start to vary because of the different user interfaces between the MJPEG and H.264 cameras. I have split the guide into two sections at this point, starting with the MJPEG cameras.
MJPEG Static IP Guide (XX40A, XX36/42A, XX34/41A)Once you get to the live video screen go to Network and then Basic Network Settings.
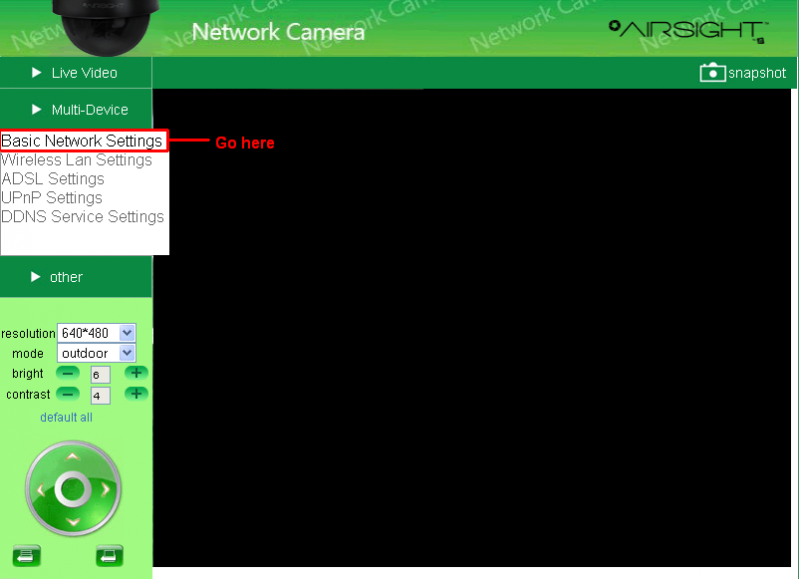
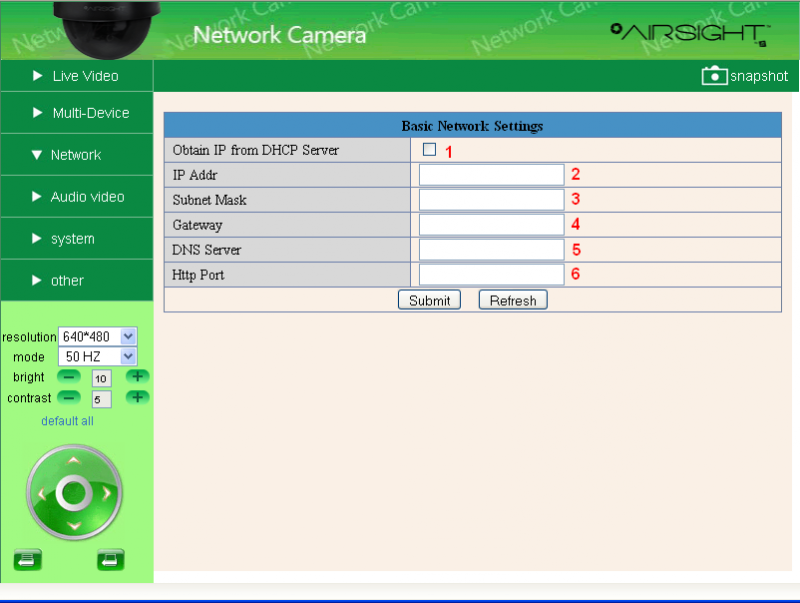
Once at this page it will just show Obtain IP from DHCP Server
(1) and Http Port
(6). Uncheck the box that says Obtain IP from DHCP Server and it will show the rest of the options I have in my screenshot here. Set them as follows:
1. Uncheck
2. This is the IP address of the camera. The first three sets of numbers will always match your default gateway. The last set of numbers, after the third period, should be a number that is between 2 and 254.
I recommend using a number that is about 25 higher than your IPv4 address (remember, this is your computer's IP). For example, if my IPv4 address was 192.168.1.7, I would choose 192.168.1.41 for my camera's IP.
If you have more than one camera they all need their own IP addresses. I always advise
3. The subnet mask will always be
255.255.255.0.
4/5. These will both be your default gateway we found earlier.
6. By default this will be set to 80. We do not want to use port 80, instead,
use something like 8001 or 8081. When using multiple cameras I advise using 8001, 8002, etc, because it is easier to remember.
Hit submit and your camera will reboot. Now we can move on to the next step.
H.264 Static IP Guide (XX39A/XX59A)This is basically the same as for the MJPEG cameras, but with a few more options and one major change. From the live video screen, go to the params menu in the upper right corner.
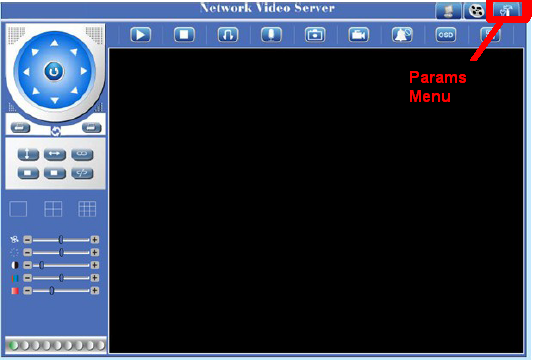
From this next menu go to Basic Network Settings. You should see the following screen:
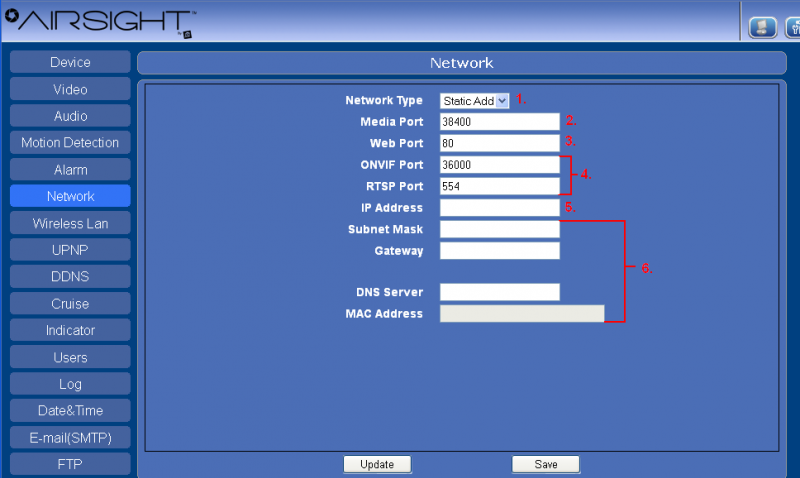
Once you are on this page set the Network Type to Static Address and it will show the rest of the options I have in my screenshot here. Set them as follows:
1. Set this to Static Address
2. Leave this as 38401 unless you have more than one camera. If you do, set them to 38401, 38402, etc.
3. By default this will be set to 80. We do not want to use port 80, instead,
use something like 8001 or 8081. When using multiple cameras I advise using 8001, 8002, etc, because it is easier to remember.
4. Leave these alone.
5. This is the IP address of the camera. The first three sets of numbers will always match your default gateway. The last set of numbers, after the third period, should be a number that is between 2 and 254.
I recommend using a number that is about 25 higher than your IPv4 address (remember, this is your computer's IP). For example, if my IPv4 address was 192.168.1.7, I would choose 192.168.1.41 for my camera's IP.
6. This stuff should all be set correctly. If your default gateway is not 192.168.1.1 you will need to change the Gateway and DNS Server here to match the correct default gateway for your network.
Hit update and your camera will reboot. Now we can move on to the next step.
Step Three: Port ForwardingHonestly there are so many routers I can't even begin to make a comprehensive port forwarding guide. Your best resource at this point is going to be
Port Forward, they have guides for just about every router under the sun.
I can offer some tips and help for avoiding common pitfalls though.
- You must create a separate port forwarding rule for each camera; you cannot create a port range and open, say, 8001-8004. This is because each port is assigned to be opened for a specific IP address.
- Whenever it asks for an IP address, it means the IP we assigned to the camera in step 2. It will only be the IP address, not the port or http:// or anything.
- Internal, External, Start, and End ports will always be the ports assigned to the camera.
- Protocol will always be TCP only. Not UDP, not TCP/UDP, just TCP.
- For H.264 cameras you will need to forward the Media Port as well. By default this port is 38401, don't change it unless you have more than one camera.
If you have any trouble with this step you can post your problem here and we'll figure it out.
Step Four: Accessing Your CameraIn theory your camera should now be set up correctly and accessible over the internet, but how? There are two ways to do it, I'll go over both.
The way you should try first is by using the
external IP address. This is different from any of the internal IP addresses that we found earlier. Basically the external IP is the address that other computers on the internet see your computer as. To find this address, go to google and enter
"What is my IP", then hit enter.
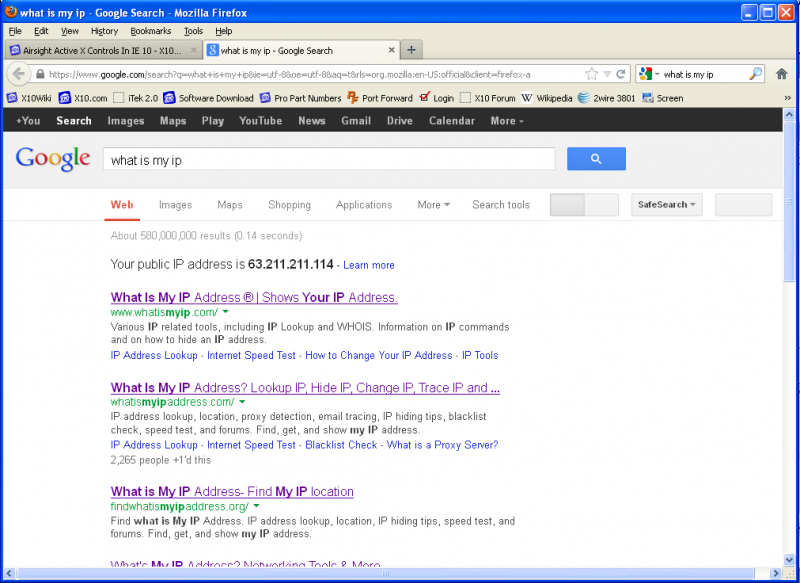
If you did it right it should show you the IP right there. Make a note of it. On a device that is not connected to your network, such as a 3G/4G phone or tablet, enter this address followed by a colon then the port number of your camera. So for example, if my external is 63.211.211.114 and my port is 8001, I would enter 63.211.211.114:8001. This should pull up the login page for the camera.
There is drawback to this however. Your external IP address will change. That's okay! Don't pay for a static IP address from your ISP, you don't need it. Airsight cameras all have their own web address, called a
DDNS Address. DDNS stands for dynamic domain name server, but that isn't really important for our purposes. This address will be on a sticker on the bottom of your camera, but we can also find it through the software. The procedure is basically the same for MJPEG and H.264 cameras.
Log in to your MJPEG camera and then go to System, then Device Info. The DDNS Status will be listed there. The web address will be something like
http://a0000.airsight.net:8000. If it isn't listed there, go to Network, then DDNS Service Settings. The DDNS will be listed here under Manufacturer's DDNS. You will need to add a colon then the port number at the end.
For H.264 cameras, the only real difference is that you need to go the Parameters Screen instead of System. Note that neither the DDNS nor the external IP will work from inside your home network. You'll still have to use the internal IP when you're at home.
You're done!If it doesn't work at this point, go back and double check your static IPs and port forwarding rules. Make sure you aren't connected to your wifi network on the device you're accessing it from. If you aren't sure, ask a friend to try it from their house. If you still can't get it, post your problem here and we'll take a look.
I don't
think I missed anything, but if I did, or anything is confusing, point it out and I'll add/fix/explain it better.
If you made it this far and it works, congratulations. You did it. You're done. That's all I have. Good work. Author
Topic: Airsight Remote Viewing Guide (with pictures) (Read 19763 times)

